In this chapter, we will learn about the complete project development lifecycle of solar power plant. Here, we will understand various stages of project development of solar power plants starting from site identification to commissioning with practical examples.
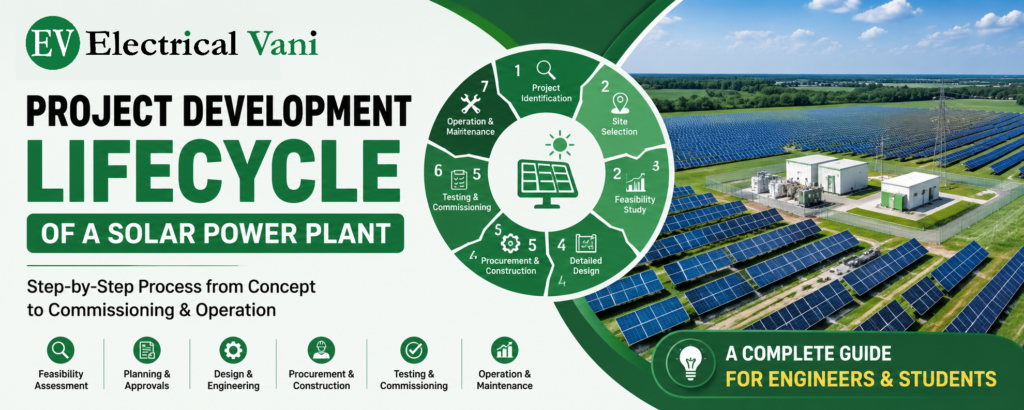
What is Project Development Lifecycle?
In the context of solar power plants, Project Development Lifecycle can be defined as a systematic process of converting a solar power plant idea into a completely operational power generating station.
Each stage of project development lifecycle has specific objectives, documents, approvals, and technical activities. If we miss or delay any stage, then it can increase project cost, delay commissioning, or even cause project failure.
Importance of Project Development Lifecycle
A structured project development process offers several advantages and helps in –
- Reducing project risks
- Improving project quality
- Controlling project cost
- Completing the project on schedule
- Ensuring regulatory compliance
- Improving plant performance
- Increasing project profitability
- Achieving long-term reliability
Typical Project Development Lifecycle of Solar Power Plant
The following figure depicts the typical project development lifecycle of a utility-scale solar power plant –
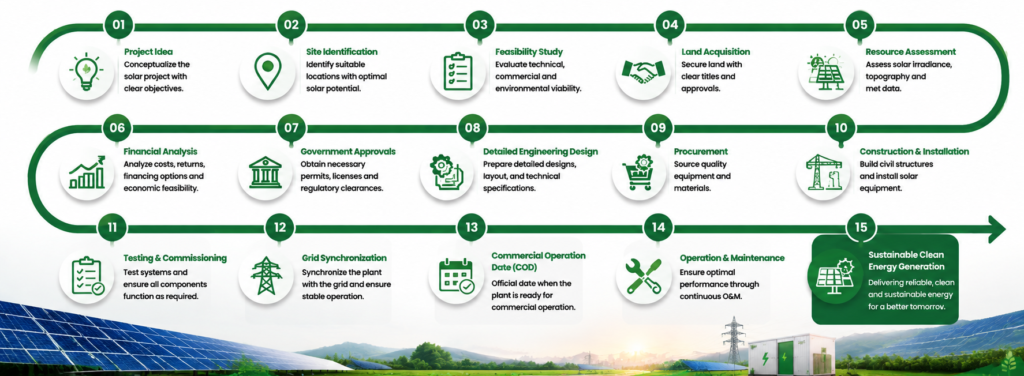
Let’s understand each stage of the project development lifecycle of the solar power plant in detail.
Stage 1: Project Identification
Every solar project starts with finding the opportunity. During this stage, the power plant developer makes the following major decisions –
- Plant capacity (5 MW, 50 MW, 100 MW, 500 MW, etc.)
- Project location
- Type of project
- Target customers
- Investment model
- Expected revenue
For example, a solar developer decides to install a 100 MW Solar PV Plant in Rajasthan because he identified the following –
- High solar irradiation
- Availability of land
- Strong transmission network
- Government incentives
Stage 2: Site Identification
At this stage, the developer will select the right site. This stage plays an important role because a poor site can reduce energy generation for the next 25 years.
The major factors considered for right site selection will be –
- Solar irradiation
- Flat terrain
- Soil condition
- Flood history
- Water availability
- Accessibility
- Distance from transmission line
- Environmental impact
- Land ownership
- Shadow-free area
Important Note: Never select land only because it is cheap. Poor accessibility, rocky terrain, or weak soil can increase construction costs significantly.
Stage 3: Feasibility Study
Once the site is identified, engineers perform a detailed feasibility study. This study determines whether the project is technically and financially viable.
Part I: Technical Feasibility
Technical feasibility study focuses on –
- Solar resource assessment
- Topographical survey
- Soil investigation
- Geotechnical analysis
- Drainage study
- Wind speed analysis
- Grid availability
- Accessibility
Part II: Financial Feasibility
Financial feasibility study is performed to determine –
- Capital cost (CAPEX)
- Operating cost (OPEX)
- Revenue estimation
- Internal Rate of Return (IRR)
- Net Present Value (NPV)
- Payback period
- Levelized Cost of Energy (LCOE)
Stage 4: Land Acquisition
After confirming the project’s feasibility, land is acquired. The land acquisition process involves the following key activities –
- Ownership verification
- Legal due diligence
- Boundary survey
- Land registration
- Mutation
- Lease agreement (if applicable)
However, the following major challenges are faced in land acquisition –
- Ownership disputes
- Agricultural land conversion
- Forest clearance
- Local community issues
Stage 5: Solar Resource Assessment
The expected energy generation depends on solar radiation. Therefore, engineering studies must be performed to analyze the following –
- GHI (Global Horizontal Irradiance)
- DNI (Direct Normal Irradiance)
- GTI (Global Tilted Irradiance)
- Ambient temperature
- Wind speed
- Rainfall
- Historical weather data
For this, engineers generally use the following tools and software –
- PVsyst
- Solargis
- SolarGIS
- Meteonorm
Stage 6: Grid Connectivity Study
The generated electricity must be injected into the power grid. Therefore, the solar developers must perform the following grid connectivity studies –
- Nearby substation
- Voltage level
- Transmission capacity
- Short circuit level
- Grid stability
- Evacuation route
Stage 7: Government Approvals
Before starting the construction of solar project, several approvals from associated government are required. These may include the following –
- Land conversion approval
- Environmental clearance
- Grid connectivity approval
- CEIG (Chief Electrical Inspector to Government) approval
- Electrical Inspector approval
- Transmission approval
- Pollution clearance (where applicable)
- Local authority permissions
Stage 8: Detailed Engineering Design
At this stage, the concept is converted into engineering drawings. Solar design engineers prepare the following key engineering designs and drawings –
- Plant layout
- Module layout
- String layout
- Inverter sizing
- Cable sizing
- Earthing layout
- Lightning protection
- SCB layout
- HT layout
- Switchyard design
- Protection philosophy
- Single Line Diagram (SLD)
- General Arrangement (GA) drawings
For this, multiple tools and software are used, some of very commonly used are listed below –
- AutoCAD
- PVsyst
- ETAP
- Helioscope
- SketchUp
- STAAD Pro
- Civil 3D
Stage 9: Procurement
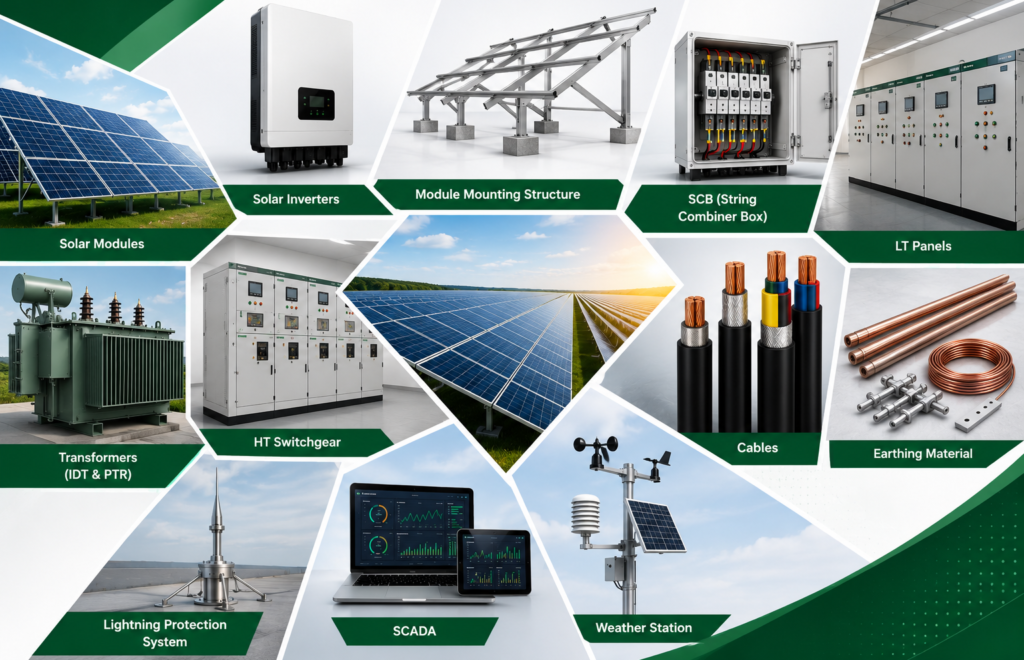
Procurement involves purchasing all equipment. The following are major equipment related to solar power plant –
|
Equipment |
Function |
| Solar Modules | Generate DC electricity |
| Solar Inverters | Convert DC to AC |
| Module Mounting Structure | Holds & Supports modules |
| SCB (String Combiner Box) | Combines string outputs |
| LT Panels | AC distribution |
| Transformers (IDT & PTR) | Voltage step-up |
| HT Switchgear | Grid connection & protection |
| Cables | Power transmission |
| Earthing Material | Safety |
| Lightning Protection System | Protects against lightning & surges |
| SCADA | Real-time plant monitoring |
| Weather Station | Environmental monitoring |
Stage 10: Project Construction & Installation
This is the execution phase where the plant is physically developed. The major activities performed during this stage include –
- Land clearing
- Boundary fencing
- Road construction
- Foundation work
- Module mounting structure installation
- Module installation
- Cable laying
- Earthing installation
- Inverter installation
- Transformer installation
- Switchyard construction
- SCADA installation
During erection of project, the following safety practices must be followed by the construction teams –
- PPE (Personal Protective Equipment) usage
- Lockout-Tagout (LOTO)
- Work at height procedures
- Electrical safety
- Crane safety
- Excavation safety
- Permit to Work (PTW)
Stage 11: Testing & Commissioning
Before final energization of the system, every part of the system must be tested to avoid any kind of failure. In solar power plant, the following common tests are performed during testing & commissioning –
- Insulation Resistance Test
- Continuity Test
- Polarity Test
- Earth Resistance Test
- Transformer Tests
- Relay Testing
- Protection Testing
- Inverter Functional Test
- String Testing
- IV Curve Test
- Thermography
- SCADA Communication Test
Stage 12: Grid Synchronization
After completing the testing phase, the plant is synchronized with the power grid. At this stage, the following parameters are verified as per grid compliance –
- Voltage
- Frequency
- Phase sequence
- Protection settings
- Synchronization conditions
Only after approval is power exported to the grid.
Stage 13: Commercial Operation Date (COD)
COD is the official date from which the solar plant starts commercial electricity generation under the Power Purchase Agreement (PPA). From this date –
- Revenue generation begins.
- Energy billing starts.
- Performance guarantees become applicable.
- O&M responsibilities commence.
Stage 14: Operation & Maintenance (O&M)
In general, the solar project lifecycle continues for 25 years or more through efficient operation and maintenance. In a solar power plant, the following daily O&M activities are performed by engineers –
- SCADA monitoring
- Radiation & Generation analysis
- Module cleaning
- Vegetation control
- Preventive maintenance
- Breakdown maintenance
- Inverter inspection
- Transformer maintenance
- Thermography
- PR and CUF analysis
Documents Generated During the Solar Project Development
At different stages of project development of a solar power plant, the following major documents are generated & kept for future references –
|
Project Development Stage |
Document Generated |
| Feasibility | Feasibility Report, DPR (Daily Progress Report) |
| Survey | Topographical Survey Report |
| Soil Investigation | Geotechnical Report |
| Design | SLD (Single Line Diagram), GA (General Arrangement), Layout Drawings |
| Procurement | BOQ (Bill of Quantity), Technical Specifications, Purchase Orders |
| Construction | Method Statements, Inspection Reports |
| Testing | FAT (Factory Acceptance Test), SAT (Site Acceptance Test), Test Reports |
| Commissioning | Commissioning Report |
| Handover | As-built Drawings, O&M Manual, Warranty Documents |
Roles of Different Engineers
In a solar power plant project, different engineers are appointed to perform different types of duties –
|
Engineer Roles |
Responsibilities |
| Solar Design Engineer | Plant design, layouts, simulations |
| Electrical Design Engineer | SLD, protection, cable sizing |
| Civil Engineer | Foundations, roads, drainage |
| Procurement Engineer | Equipment sourcing |
| Project Engineer | Coordination and execution |
| Site Engineer | Daily construction supervision |
| QA/QC Engineer | Quality inspections |
| Commissioning Engineer | Testing and energization |
| SCADA Engineer | Monitoring system integration |
| O&M Engineer | Long-term plant performance monitoring |
Practical Challenges in Indian Solar Projects
Engineers face the following major challenges in Indian solar plant projects –
- Delays in land acquisition
- Monsoon affecting construction
- Supply chain disruptions
- Module delivery delays
- Transformer shortages
- Grid connectivity delays
- Right-of-way (ROW) issues
- Labor shortages
- Wildlife and environmental restrictions
- Unexpected soil conditions
- Grid curtailments after commissioning
Best Practices for Successful Solar Project Development
Solar developers could follow the below mentioned best practices to make their solar project development successful –
- Conduct detailed site surveys before land purchase.
- Use reliable solar resource data for energy estimation.
- Complete all statutory approvals before starting construction.
- Standardize engineering drawings and technical specifications.
- Procure equipment from reputed manufacturers.
- Implement strict quality control during installation.
- Maintain clear communication among developers, EPC contractors, utilities, and vendors.
- Perform comprehensive pre-commissioning tests.
- Maintain complete documentation for future O&M and audits.